Configure Microkernel Router
* Access
 - Gateway Durability               uncheck
 - Use Local Microkernel Engine     check
 - Use Remote Microkernel Engine    check
 - Use IDS                          uncheck
 - Number of Load Retries           5
 - Wire Encryption                  If Needed
 - Wire Encryption Level            Medium
* Communication protocols
 - Enable Auto Reconnect            uncheck
 - Conecton Timeout in sec          15
 - Supported Protocols
   - SPXII                          uncheck
   - TCP/IP                         check
   - NETBIOS                        uncheck
* Performance tuning
 - Use Cache Engine                 uncheck
* Security
 - Runtime Server Support           Yes
* Application characteristics
 - Embedded Spaces                  check
 - Splash Screen                    uncheck
 - Verify Key Length                check

Configure Local Engine
* Information
 - Encoding                         windows-1252
* Access
 - Accept Remote Request            check
 - Prompt for Client Credencials    uncheck
 - Allow Client-stored Credentials  check
 - Allow Cache Engine Connections   check
 - Wire Encryption                  If Needed
 - Wire Encryption Level            Medium
* Communication protocols
 - Enable Auto Reconnect            uncheck
 - TCP/IP Multihomed                check
 - NetBIOS Port                     66
 - Auto Reconnect Timeout in sec    180
 - TCP/IP Port                      1583
 - Listen IP Address                0.0.0.0
 - Supported Protocols
   - SPXII                          uncheck
   - TCP/IP                         check
* Compatibility
 - Create File Version              6.x
 - System Data                      If Needed
* Data integrity
 - Archival Logging Selected Files  uncheck
 - Transaction Durability           uncheck
 - Transaction Logging              check
 - Operation Bundle Limit           65535
 - Initiation Time Limit in msec    10000
 - Wait Lock Timeout in msec        15000
* Debugging    default
 - Trace Operation                  uncheck
 - Number of Bytes from Data Buffer 128
 - Number of Bytes from Key Buffer  128
 - Trace File LOcation              C:\Documents and Settings\All Users\
 - Select Operations                All check
* Directories    default
 - Transaction Log Directory        C:\PVSW\bin\MKDE\LOG
 - Working Directory                blank
 - DBNames Configuration Location   C:\WINDOWS
* Memory usage    default
 - System Cache                     uncheck
 - Allocate Resources at Startup    uncheck
 - Back Buffer Size in byte(s)      0
 - Minimal State Delay in msec      300000
* Performance tuning
 - Index Balancing                  uncheck
 - Limit Segment Size to 2Gb        check
 - Cache Allocation Size in MB         64
 - Log Buffer Size in byte(s)       1046576
 - Number of Input/Output Threads   32
 - Communications Threads           16
 - Transaction Log Size in byte(s)  2097152
 - Max Microkernel Memory Usage     60
 - File Growth Factor               15
Sabtu, 20 November 2010
Konfigurasi Pervasive Workgroup 10 untuk Client Magic 7/8

Jumat, 19 November 2010
Mengetahui perfoma squid
Dari terminal jalankan perintah berikut dengan akses root

[root@proxy squid]# squidclient -p 3128 mgr:info

HTTP/1.0 200 OK
Server: squid/2.6.STABLE21
Date: Sat, 20 Nov 2010 03:55:19 GMT
Content-Type: text/plain
Expires: Sat, 20 Nov 2010 03:55:19 GMT
Last-Modified: Sat, 20 Nov 2010 03:55:19 GMT
X-Cache: MISS from proxy.angsana.lan
X-Cache-Lookup: MISS from proxy.angsana.lan:3128
Via: 1.0 proxy.angsana.lan:3128 (squid/2.6.STABLE21)
Proxy-Connection: close

Squid Object Cache: Version 2.6.STABLE21
Start Time: Fri, 19 Nov 2010 08:11:30 GMT
Current Time: Sat, 20 Nov 2010 03:55:19 GMT
Connection information for squid:
 Number of clients accessing cache: 12
 Number of HTTP requests received: 104083
 Number of ICP messages received: 0
 Number of ICP messages sent: 0
 Number of queued ICP replies: 0
 Request failure ratio:  0.00
 Average HTTP requests per minute since start: 87.9
 Average ICP messages per minute since start: 0.0
 Select loop called: 4141085 times, 17.152 ms avg
Cache information for squid:
 Request Hit Ratios: 5min: 21.9%, 60min: 11.3%
 Byte Hit Ratios: 5min: 2.9%, 60min: 1.7%
 Request Memory Hit Ratios: 5min: 0.0%, 60min: 1.5%
 Request Disk Hit Ratios: 5min: 50.0%, 60min: 52.9%
 Storage Swap size: 460732 KB
 Storage Mem size: 8156 KB
 Mean Object Size: 13.68 KB
 Requests given to unlinkd: 31954
Median Service Times (seconds)  5 min    60 min:
 HTTP Requests (All):   0.10857  0.30459
 Cache Misses:          0.22004  0.44492
 Cache Hits:            0.03066  0.03066
 Near Hits:             0.02899  0.03622
 Not-Modified Replies:  0.00179  0.00379
 DNS Lookups:           0.00669  0.01940
 ICP Queries:           0.00000  0.00000
Resource usage for squid:
 UP Time: 71028.763 seconds
 CPU Time: 539.778 seconds
 CPU Usage: 0.76%
 CPU Usage, 5 minute avg: 0.70%
 CPU Usage, 60 minute avg: 1.24%
 Process Data Segment Size via sbrk(): 19988 KB
 Maximum Resident Size: 0 KB
 Page faults with physical i/o: 2
Memory usage for squid via mallinfo():
 Total space in arena:   20120 KB
 Ordinary blocks:        19973 KB    444 blks
 Small blocks:               0 KB      0 blks
 Holding blocks:           244 KB      1 blks
 Free Small blocks:          0 KB
 Free Ordinary blocks:     146 KB
 Total in use:           20217 KB 99%
 Total free:               146 KB 1%
 Total size:             20364 KB
Memory accounted for:
 Total accounted:        16083 KB
 memPoolAlloc calls: 15737672
 memPoolFree calls: 15593786
File descriptor usage for squid:
 Maximum number of file descriptors:   1024
 Largest file desc currently in use:    216
 Number of file desc currently in use:   67
 Files queued for open:                   0
 Available number of file descriptors:  957
 Reserved number of file descriptors:   100
 Store Disk files open:                   0
 IO loop method:                     epoll
Internal Data Structures:
  33708 StoreEntries
   1736 StoreEntries with MemObjects
   1730 Hot Object Cache Items
  33669 on-disk objects

Kayaknya belum OPtimal nih, ada yang bisa bantu
Senin, 08 November 2010
Cara setting transparent proxy clearos dalam mode standalone
Topologi :
modem ----------- Router ------------ Switch ---------- Client.....
...................................|..............................................
...................................|..............................................
....................ClearOS proxy server....................................
......................(Standalone mode).....................................
...................................................................
Alokasi IP
WAN Mikrotik 115.124.xx.xx
LAN Mikrotik 192.168.1.254
PROXY Mikrotik 192.168.3.2
ClearOS 192.168.3.1
Kebetulan saya menggunakan Mikrotik RB450
OK kita setting interfaces dan ip untuk mikrotik terlebih dahulu
/interface ethernet
set 0 arp=enabled auto-negotiation=yes bandwidth=unlimited/unlimited comment=\
"" disabled=no full-duplex=yes mac-address=00:0C:42:3D:XX:XX master-port=\
none mtu=1500 name=WAN speed=100Mbps
set 1 arp=enabled auto-negotiation=yes bandwidth=unlimited/unlimited comment=\
"" disabled=no full-duplex=yes mac-address=00:0C:42:3D:XX:XX master-port=\
none mtu=1500 name=LAN speed=100Mbps
set 3 arp=enabled auto-negotiation=yes comment="" disabled=no full-duplex=yes \
mac-address=00:0C:42:3D:XX:XX mtu=1500 name=proxy speed=100Mbps
/ip address
add address=115.124.XX.XX/30 broadcast=115.124.xx.xx comment="" disabled=no \
interface=WAN network=115.124.XX.XX
add address=192.168.1.254/24 broadcast=192.168.1.255 comment="" disabled=no \
interface=LAN network=192.168.1.0
add address=192.168.3.2/30 broadcast=192.168.3.3 comment="" disabled=no \
interface=proxy network=192.168.3.0
Setelah kita set DNS,NAT untuk LAN
/ip firewall nat
add action=src-nat chain=srcnat comment="" disabled=no dst-address=0.0.0.0/0 \
out-interface=to_isp src-address=192.168.1.0/24 to-addresses=\
115.124.XX.XX to-ports=0-65535
/ip dns
set allow-remote-requests=yes cache-max-ttl=1w cache-size=2048KiB \
max-udp-packet-size=512 primary-dns=202.182.XX.XX secondary-dns=\
202.159.XX.XX
/ip dns static
add address=192.168.3.1 disabled=no name=proxy ttl=1d
Setting IP Address Client
misal untuk client1
IP : 192.168.1.1
netmask : 255.255.255.0
gateway : 192.168.1.254
dns1 : 192.168.1.254
dns2 : 202.182.XX.XX
Test client untuk Browsing seharusnya sudah bisa kalau belum bisa periksa kembali
setting di atas sampai client bisa browsing
OK selanjutnya persiapan untuk proxy
buat NAT di Mikrotik untuk Proxy
/ip firewall nat
add action=src-nat chain=srcnat comment="link proxy" disabled=no dst-address=\
0.0.0.0/0 out-interface=WAN src-address=192.168.3.0/30 to-addresses=\
115.124.XX.XX to-ports=0-65535
add action=dst-nat chain=dstnat comment="transproxy" disabled=\
no dst-port=80,8080 in-interface=to_swicht protocol=tcp src-address=\
!192.168.3.1 to-addresses=192.168.3.1 to-ports=3128
setelah itu install CLearOS
install ClearOS Server Standalone Mode - No Firewall
edit file /etc/firewall, cari dan ganti parameter berikut
SQUID_TRANSPARENT="on"
[root@proxy etc]# cat firewall | grep SQUID
SQUID_TRANSPARENT="on"
edit file /etc/resolv.conf, tambahkan nameserver (DNS) ISP anda
[root@proxy etc]# cat resolv.conf
nameserver 202.182.xx.xx
pastikan gateway proxy sudah ke IP PROXY Mikrotik, jika menggunakan ClearOS
sudah ada di menu network->ip setting klik edit ikuti wizardnya dan jangan
lupa gateway dan dns nya sudah benar, untuk memastikan bisa lihat file ifcfg-eth0
ada di direktory /etc/sysconfig/network-scripts
[root@proxy network-scripts]# cat ifcfg-eth0
DEVICE=eth0
TYPE="Ethernet"
ONBOOT="yes"
USERCTL="no"
BOOTPROTO="static"
IPADDR="192.168.3.1"
NETMASK="255.255.255.0"
HWADDR="00:50:da:93:4c:53"
GATEWAY="192.168.3.2"
Jalankan Web Proxy ada di menu
gateway -> Web Proxy
klik start dan buat automatic
Jangan lupa buat acl nya dulu yah di Squid bisa dari webconfignya kok
Jangan lupa buat acl nya dulu yah di Squid bisa dari webconfignya kok
Sekarang Proxy kita sudah siap di uji coba
Rabu, 03 November 2010
Konfigurasi Pervasive Server 9.1 untuk Client menggunakan Magic 7/8
Configure Microkernel Router
* Access
 - Gateway Durability               uncheck
 - Use Local Microkernel Engine     check
 - Use Remote Microkernel Engine    check
 - Use IDS                          uncheck
 - Number of Load Retries           5
 - Wire Encryption                  If Needed
 - Wire Encryption Level            Medium
* Communication protocols
 - Enable Auto Reconnect            uncheck
 - Conecton Timeout in sec          15
 - Supported Protocols
   - SPXII                          uncheck
   - TCP/IP                         check
   - NETBIOS                        uncheck
* Performance tuning
 - Use Cache Engine                 uncheck
* Security
 - Runtime Server Support           Yes
* Application characteristics
 - Embedded Spaces                  check
 - Splash Screen                    uncheck
 - Verify Key Length                check

Configure Local Engine
* Information
 - Encoding                         windows-1252
* Access
 - Accept Remote Request            check
 - Prompt for Client Credencials    uncheck
 - Allow Client-stored Credentials  check
 - Allow Cache Engine Connections   uncheck
 - Wire Encryption                  If Needed
 - Wire Encryption Level            Medium
* Communication protocols
 - Enable Auto Reconnect            uncheck
 - TCP/IP Multihomed                check
 - Auto Reconnect Timeout in sec    15
 - TCP/IP Port                      1583
 - Listen IP Address                0.0.0.0
 - Supported Protocols
   - SPXII                          uncheck
   - TCP/IP                         check
* Compatibility
 - Create File Version              9.x
 - System Data                      If Needed
* Data integrity
 - Archival Logging Selected Files  uncheck
 - Transaction Durability           uncheck
 - Transaction Logging              check
 - Operation Bundle Limit           65535
 - Initiation Time Limit in msec    10000
 - Wait Lock Timeout in msec        15000
* Debugging    default
 - Trace Operation                  uncheck
 - Number of Bytes from Data Buffer 128
 - Number of Bytes from Key Buffer  128
 - Trace File LOcation              C:\PVSW\bin\MKDE.TRA
 - Select Operations                All check
* Directories    default
 - Transaction Log Directory        C:\PVSW\bin\MKDE\LOG
 - Working Directory                blank
 - DBNames Configuration Location   C:\WINDOWS
* Memory usage    default
 - System Cache                     uncheck
 - Allocate Resources at Startup    uncheck
 - Back Buffer Size in byte(s)      0
 - Minimal State Delay in msec      300000
* Performance tuning
 - Index Balancing                  uncheck
 - Limit Segment Size to 2Gb        uncheck
 - Communications Threads           32
 - Cache Allocation Size in byte(s) 429382656
 - Log Buffer Size in byte(s)       1046576
 - Number of Input/Output Threads   64
 - Transaction Log Size in byte(s)  2097152
 - Max Microkernel Memory Usage     60
 - File Growth Factor               15
Jumat, 08 Oktober 2010
disable complex password windows 2003
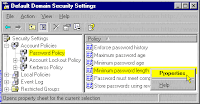
Select Domain Security Policy from Administrative Tools.
Click on Security Settings > Account Policies > Password Policy.
Right-click on Minimum password length in the right pane.
Click Properties from the context menu.
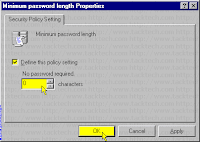
Do not remove the check from the Define this policy setting checkbox!
Enter a new minimum password length. Entering a Zero (0) will remove the password requirement.
Click the OK button.
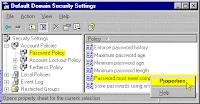
Double-click on Passwords must meet complexity requirements in the right pane.
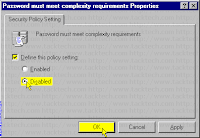
Do not remove the check from the Define this policy setting checkbox!
Select the Disabled option.
(This will allow simpler passwords.)
Click the OK button.
Close the Default Domain Security Settings window.
Now, you need to put the new Password Policy into effect.
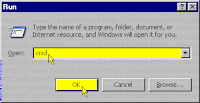
Click Start > Run...
Type cmd into the Open: input box.
Click the OK button.
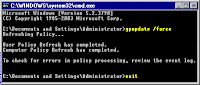
Type gpupdate /force at the Command Prompt.
Press the [Enter] key.
Type exit.
Press the [Enter] key.
Click on Security Settings > Account Policies > Password Policy.
Right-click on Minimum password length in the right pane.
Click Properties from the context menu.

Do not remove the check from the Define this policy setting checkbox!
Enter a new minimum password length. Entering a Zero (0) will remove the password requirement.
Click the OK button.

Double-click on Passwords must meet complexity requirements in the right pane.

Do not remove the check from the Define this policy setting checkbox!
Select the Disabled option.
(This will allow simpler passwords.)
Click the OK button.

Close the Default Domain Security Settings window.
Now, you need to put the new Password Policy into effect.
Click Start > Run...
Type cmd into the Open: input box.
Click the OK button.

Type gpupdate /force at the Command Prompt.
Press the [Enter] key.
Type exit.
Press the [Enter] key.

Senin, 06 September 2010
Readext3/ext4 Partition from Windows
Sejak Ubuntu versi 9.10 Karmic Koala menggunakan filesystem ext4 secara default,
dan versi sebelumnya menggunakan filesystem ext2 dan ext3. Ada beberapa pilihan
untuk membaca dan menulis ext2 dari windows, namun dukungan untuk ext3 dan ext4
adalah filesystem yang sama sekali berbeda.
Setelah googling kesana-kemari akhirnya saya temukan software yang cocok untuk
membaca dan menulis filesystem ext4 dari windows yaitu Ext2FSD
Dengan Ext2FSD saya berhasil mengakses filesystem ext4 saya dari windwos XP
berikut adalah langkah2 instalasi Ext2FSD di Windows XP
1. Download Ext2FSD dari http://www.ext2fsd.com/
2. Jalankan installer ext2fsd. Pada saat menginstall saya sarankan untuk menhapus
centang pada “enable write access” untuk menjaga kehilangan data secara tidak
sengaja pada partisi Linux Anda
3. Restart Windows XP
4. Jalankan Ext2 Volume Manager dari Start Menu
Sekarang anda dapat me-mount partisi ext2/ext3 dan ext4 linux anda dari Windows XP
dan membaca tanpa masalah.
dan versi sebelumnya menggunakan filesystem ext2 dan ext3. Ada beberapa pilihan
untuk membaca dan menulis ext2 dari windows, namun dukungan untuk ext3 dan ext4
adalah filesystem yang sama sekali berbeda.
Setelah googling kesana-kemari akhirnya saya temukan software yang cocok untuk
membaca dan menulis filesystem ext4 dari windows yaitu Ext2FSD
Dengan Ext2FSD saya berhasil mengakses filesystem ext4 saya dari windwos XP
berikut adalah langkah2 instalasi Ext2FSD di Windows XP
1. Download Ext2FSD dari http://www.ext2fsd.com/
2. Jalankan installer ext2fsd. Pada saat menginstall saya sarankan untuk menhapus
centang pada “enable write access” untuk menjaga kehilangan data secara tidak
sengaja pada partisi Linux Anda
3. Restart Windows XP
4. Jalankan Ext2 Volume Manager dari Start Menu
Sekarang anda dapat me-mount partisi ext2/ext3 dan ext4 linux anda dari Windows XP
dan membaca tanpa masalah.
Senin, 12 Juli 2010
Setting Pervasive untuk Platinum local windows 7
Pervasive Control Center
Microkernel Router
Application characteristics
Buang Checklist Embedded Spaces
Microkernel Router
Application characteristics
Buang Checklist Embedded Spaces
Rabu, 30 Juni 2010
Bagai mana mengechek compiz
download script berikut
wget http://blogage.de/files/9124/download -O compiz-check
chmod +x
jalankan script
contoh output
budhi@budhi-laptop:~/script$ ./compiz-check
Gathering information about your system...
Distribution: Ubuntu 10.04
Desktop environment: GNOME
Graphics chip: Intel Corporation Mobile 4 Series Chipset Integrated Graphics Controller (rev 07)
Driver in use: intel
Rendering method: AIGLX
Checking if it's possible to run Compiz on your system...
Checking for texture_from_pixmap... [ OK ]
Checking for non power of two support... [ OK ]
Checking for composite extension... [ OK ]
Checking for FBConfig... [ OK ]
Checking for hardware/setup problems... [ OK ]
wget http://blogage.de/files/9124/download -O compiz-check
chmod +x
jalankan script
contoh output
budhi@budhi-laptop:~/script$ ./compiz-check
Gathering information about your system...
Distribution: Ubuntu 10.04
Desktop environment: GNOME
Graphics chip: Intel Corporation Mobile 4 Series Chipset Integrated Graphics Controller (rev 07)
Driver in use: intel
Rendering method: AIGLX
Checking if it's possible to run Compiz on your system...
Checking for texture_from_pixmap... [ OK ]
Checking for non power of two support... [ OK ]
Checking for composite extension... [ OK ]
Checking for FBConfig... [ OK ]
Checking for hardware/setup problems... [ OK ]
Selasa, 29 Juni 2010
Multimedia Ubuntu 10.04
sudo wget http://www.medibuntu.org/sources.list.d/lucid.list --output-document=/etc/apt/sources.list.d/medibuntu.list
sudo apt-get update && sudo apt-get install medibuntu-keyring && sudo apt-get update
sudo apt-get install gstreamer0.10-plugins-good gstreamer0.10-plugins-bad gstreamer0.10-plugins-ugly gstreamer0.10-ffmpeg gstreamer0.10-pitfdll gstreamer0.10-plugins-bad-multiverse gstreamer0.10-plugins-ugly-multiverse gstreamer0.10-fluendo-mp3 gstreamer0.10-gnonlin gstreamer0.10-plugins-farsight gstreamer0.10-sdl gstreamer-dbus-media-service gstreamer-tools
sudo apt-get install realplayer w32codecs libdvdcss2 libxine1-ffmpeg debhelper fakeroot libfftw3-dev jackd sidplay-base liblrdf0-dev xsidplay mplayer avifile-divx-plugin avifile-xvid-plugin dh-make g++-multilib g++-4.3-multilib gcc-4.3-doc libstdc++6-4.3-dbg cvs gettext-doc jack-tools libjackasyn0 avifile-mad-plugin avifile-mjpeg-plugin avifile-player avifile-utils avifile-vorbis-plugin avifile-win32-plugin libcurl3-dbg libgcrypt11-doc libggi-target-emu libggi-target-monotext libggimisc2 gnutls-doc gnutls-bin guile-gnutls krb5-doc libraptor1-doc libstdc++6-4.3-doc mplayer-doc diff-doc
sudo apt-get install easytag faac faad ffmpeg ffmpeg2theora flac gxine icedax id3tool id3v2 lame liba52-0.7.4-dev libavfilter0 libflac++6 libid3-3.8.3c2a libjpeg-progs libmozjs0d libmp4v2-0 libmpg123-0 libsox-fmt-alsa libsox-fmt-base libsox1 mpeg2dec mpeg3-utils mpegdemux mpg123 mpg321 libamrnb3 libamrwb3 sox tagtool toolame vorbis-tools gecko-mediaplayer
sudo apt-get update && sudo apt-get install medibuntu-keyring && sudo apt-get update
sudo apt-get install gstreamer0.10-plugins-good gstreamer0.10-plugins-bad gstreamer0.10-plugins-ugly gstreamer0.10-ffmpeg gstreamer0.10-pitfdll gstreamer0.10-plugins-bad-multiverse gstreamer0.10-plugins-ugly-multiverse gstreamer0.10-fluendo-mp3 gstreamer0.10-gnonlin gstreamer0.10-plugins-farsight gstreamer0.10-sdl gstreamer-dbus-media-service gstreamer-tools
sudo apt-get install realplayer w32codecs libdvdcss2 libxine1-ffmpeg debhelper fakeroot libfftw3-dev jackd sidplay-base liblrdf0-dev xsidplay mplayer avifile-divx-plugin avifile-xvid-plugin dh-make g++-multilib g++-4.3-multilib gcc-4.3-doc libstdc++6-4.3-dbg cvs gettext-doc jack-tools libjackasyn0 avifile-mad-plugin avifile-mjpeg-plugin avifile-player avifile-utils avifile-vorbis-plugin avifile-win32-plugin libcurl3-dbg libgcrypt11-doc libggi-target-emu libggi-target-monotext libggimisc2 gnutls-doc gnutls-bin guile-gnutls krb5-doc libraptor1-doc libstdc++6-4.3-doc mplayer-doc diff-doc
sudo apt-get install easytag faac faad ffmpeg ffmpeg2theora flac gxine icedax id3tool id3v2 lame liba52-0.7.4-dev libavfilter0 libflac++6 libid3-3.8.3c2a libjpeg-progs libmozjs0d libmp4v2-0 libmpg123-0 libsox-fmt-alsa libsox-fmt-base libsox1 mpeg2dec mpeg3-utils mpegdemux mpg123 mpg321 libamrnb3 libamrwb3 sox tagtool toolame vorbis-tools gecko-mediaplayer
Jumat, 11 Juni 2010
Jika status stat di zimbra server tidak jalan
ini biasanya terjadi jika salah satu folder di dalam /opt/zimbra/zmstat ada yang right nya tidak di miliki oleh zimbra biasanya oleh root untuk itu kita hanya tingal chown saja ke zimbra
Minggu, 09 Mei 2010
Bagaimana Sharing Address Book di Zimbra
Bagaimana Sharing Address Book di Zimbra
Kita buat address book di account kita terlebih dahulu, address book tersebut di buat di webmail-nya Zimbra
jadi kita harus login dahulu ke webmail zimbra kita, setelah itu kita bisa mulai membuat address book pada
webmail klik tab address book dari situ kita klik new contact lalu isi field2 yang di butuhkan jangan lupa
email address-nya seteleh address book kita lengkap kita bisa share address book kita dengan user yang satu
domain atau bahkan user diluar domain kita (berupa file csv yang dapat di import ke MUA yang lain).
cara menshare address book adalah sebagai berikut masih pada tab address book kita ke kiri di menu navigasi
ada adddress book, contacts dan emailed contacts, kita klik kanan pada menu navigasi contacts akan muncul
pop up menu yang berisi New Address Book dan Share Address Book kita pilih share address book akan muncul
window pop up yang berisi form untuk siapa kita akan menshare address book kita
ada tiga radio buton
1. Internal user or group
2. External guest (view only)
3. Public (view only no password)
Jika kita pilih nomor 1 maka kita harus melilih role yang ada
tapi sebelumnya harus isi email address yang akan kita berikan
access untuk melihat address book kita
1. none
2. Viewer View
3. Manager View, Edit, Add, Remove, Accept, Decline
4. Admin View, Edit, Add, Remove, Accept, Decline, Administer
Jika kita pilih nomor 2 maka kita maka kita cukup mengisi email
address yang akan kita berikan access untuk melihat address book
kita dan password untuk meng aksesnya
Jika kita pilih nomor3 maka kita akan dapat link URL dimana file
address book (file dalam format csv) kita bisa diambil dan kemudian
file tersebut di import di email client
Cara mengaitkan address book yang di share di address book kita
Pada menu navigasi address book klik kanan maka akan muncul popup
menu pilih link to shared address book kita tinggal isi data yang
minta
email : di isi email address yang memberikan address booknya untuk di share
path : kita isi Contacts
Name : biarkan default
setelah itu klik OK
Kita buat address book di account kita terlebih dahulu, address book tersebut di buat di webmail-nya Zimbra
jadi kita harus login dahulu ke webmail zimbra kita, setelah itu kita bisa mulai membuat address book pada
webmail klik tab address book dari situ kita klik new contact lalu isi field2 yang di butuhkan jangan lupa
email address-nya seteleh address book kita lengkap kita bisa share address book kita dengan user yang satu
domain atau bahkan user diluar domain kita (berupa file csv yang dapat di import ke MUA yang lain).
cara menshare address book adalah sebagai berikut masih pada tab address book kita ke kiri di menu navigasi
ada adddress book, contacts dan emailed contacts, kita klik kanan pada menu navigasi contacts akan muncul
pop up menu yang berisi New Address Book dan Share Address Book kita pilih share address book akan muncul
window pop up yang berisi form untuk siapa kita akan menshare address book kita
ada tiga radio buton
1. Internal user or group
2. External guest (view only)
3. Public (view only no password)
Jika kita pilih nomor 1 maka kita harus melilih role yang ada
tapi sebelumnya harus isi email address yang akan kita berikan
access untuk melihat address book kita
1. none
2. Viewer View
3. Manager View, Edit, Add, Remove, Accept, Decline
4. Admin View, Edit, Add, Remove, Accept, Decline, Administer
Jika kita pilih nomor 2 maka kita maka kita cukup mengisi email
address yang akan kita berikan access untuk melihat address book
kita dan password untuk meng aksesnya
Jika kita pilih nomor3 maka kita akan dapat link URL dimana file
address book (file dalam format csv) kita bisa diambil dan kemudian
file tersebut di import di email client
Cara mengaitkan address book yang di share di address book kita
Pada menu navigasi address book klik kanan maka akan muncul popup
menu pilih link to shared address book kita tinggal isi data yang
minta
email : di isi email address yang memberikan address booknya untuk di share
path : kita isi Contacts
Name : biarkan default
setelah itu klik OK
Langganan:
Postingan (Atom)